Sunday, October 9, 2022

Kubernetes - Notes


https://matt-rickard.com/docker-desktop-alternatives

https://cri-o.io/

Releases: https://github.com/cri-o/cri-o/releases

Install cri-o

  dnf module list cri-o
  VERSION=1.18
  dnf module enable cri-o:$VERSION
  dnf install cri-o
export OS=CentOS_8
export VERSION=1.25

curl -L -o /etc/yum.repos.d/devel:kubic:libcontainers:stable.repo https://download.opensuse.org/repositories/devel:/kubic:/libcontainers:/stable/$OS/devel:kubic:libcontainers:stable.repo
curl -L -o /etc/yum.repos.d/devel:kubic:libcontainers:stable:cri-o:$VERSION.repo https://download.opensuse.org/repositories/devel:kubic:libcontainers:stable:cri-o:$VERSION/$OS/devel:kubic:libcontainers:stable:cri-o:$VERSION.repo
yum install cri-o

https://minikube.sigs.k8s.io/docs/start/


Install kubectl

https://kubernetes.io/docs/tasks/tools/install-kubectl-linux/


Saturday, April 2, 2022

Nuitrack Development on Windows


Install cmake, VS Code

https://cmake.org/download/

https://github.com/3DiVi/nuitrack-sdk/blob/master/Platforms/nuitrack-windows-x64.exe


Intel RealSense SDK

https://github.com/IntelRealSense/librealsense/releases/tag/v2.50.0

Install Mingw

https://www.msys2.org/

https://code.visualstudio.com/docs/cpp/config-mingw

https://dev.intelrealsense.com/docs/compiling-librealsense-for-windows-guide


https://www.mingw-w64.org/downloads/


How to compile c++ in Visual Studio Code

https://code.visualstudio.com/docs/languages/cpp


OpenCV SDK

Found OpenCV Windows Pack but it has no binaries compatible with your configuration.


https://medium.com/csmadeeasy/opencv-c-installation-on-windows-with-mingw-c0fc1499f39


Notes:

https://stackoverflow.com/questions/43456982/cmake-what-is-the-difference-between-include-directories-versus-target-link

https://forum.qt.io/topic/40855/undefined-reference-to-_imp__-but-the-right-header-is-included/7


Monday, March 28, 2022

NuiTrack Resources


Install git-lfs

https://www.howtoinstall.me/ubuntu/18-04/git-lfs/


NuiTrack Samples

https://github.com/UnaNancyOwen/NuiTrackSDKSample.git


NuiTrack Installation

https://github.com/3DiVi/nuitrack-sdk


NuiTrack SDK

https://github.com/3DiVi/nuitrack-sdk/blob/master/doc/readme.md


NuiTrack Readme

 https://github.com/3DiVi/nuitrack-sdk/blob/master/doc/readme.md


Install Monodevelop

https://blog.eldernode.com/install-monodevelop-on-ubuntu/


Environment Variables 

https://github.com/UnaNancyOwen/NuiTrackSDKSample/blob/master/sample/Align/FindNuiTrack.cmake


Nuitrack Integration

https://github.com/3DiVi/nuitrack-sdk/blob/master/doc/Tutorial_integration.md


Boost C++ lib

https://www.boost.org/

Sunday, March 27, 2022

Intel Realsense Hand Tracking

Official Document

 https://www.intel.com/content/dam/develop/external/us/en/documents/hand-tracking-843462.pdf

https://www.intelrealsense.com/hand-tracking-overview/


Friday, February 18, 2022

RealSense Resources

Ethernet Client Server

https://github.com/IntelRealSense/librealsense/tree/master/wrappers/python/examples/ethernet_client_server 

https://up-shop.org/up-board-series.html

Friday, February 11, 2022

Realsense Development on Mac

Installation

https://github.com/GitwellAnyohub/Real_Sensible_Moseq/blob/master/bash_and_install/install_realsense_sdk_mac_os.sh

cmake .. -DBUILD_EXAMPLES=false -DBUILD_GRAPHICAL_EXAMPLES=false -DBUILD_WITH_OPENMP=false -DHWM_OVER_XU=false -DBUILD_PYTHON_BINDINGS=true -G Unix\ Makefiles -DPYTHON_EXECUTABLE=/Library/Frameworks/Python.framework/Versions/3.10/bin/python3

https://opencv.org/releases/ 

Install OpenCV on MAC

https://github.com/IntelRealSense/librealsense/issues/5275

PyPi Packages:

https://pypi.org/search/?q=opencv

pip install scikit-build

https://www.geeksforgeeks.org/how-to-install-opencv-4-on-macos/

Installing pyrealsense2 on MacOS

Install homebrew if you don't already have it.

Step 1

Install tools required to compile RealSense Libraries.

brew install cmake libusb pkg-config

Step 2

Compile and install Intel RealSense libraries.

git clone https://github.com/IntelRealSense/librealsense to clone librealsense

cd librealsense (or cd into wherever you cloned)

mkdir build && cd build

cmake .. -DBUILD_EXAMPLES=true -DBUILD_WITH_OPENMP=false -DHWM_OVER_XU=false -DBUILD_PYTHON_BINDINGS=true -G Unix\ Makefiles -DCMAKE_MACOSX_RPATH=ON -DCMAKE_INSTALL_RPATH="/usr/local/lib" -DPYTHON_EXECUTABLE=$(which python3)

make -j4

sudo make install

Step 3

Distribute libraries to Python site-packages

cp wrappers/python/pyrealsense2.2.50.0.cpython-310-darwin.so $(dirname $(dirname $(which python3)))/lib

cp wrappers/python/pybackend2.2.50.0.cpython-310-darwin.so $(dirname $(dirname $(which python3)))/lib


cd $(dirname $(dirname $(which python3)))/lib/ && ln -s pyrealsense2.2.50.0.cpython-310-darwin.so pyrealsense2.2.cpython-310-darwin.so

cd $(dirname $(dirname $(which python3)))/lib/ && ln -s pyrealsense2.2.50.0.cpython-310-darwin.so pyrealsense2.cpython-310-darwin.so

cd $(dirname $(dirname $(which python3)))/lib/ && ln -s pybackend2.2.50.0.cpython-310-darwin.so  pybackend2.2.cpython-310-darwin.so

cd $(dirname $(dirname $(which python3)))/lib/ && ln -s pybackend2.2.50.0.cpython-310-darwin.so  pybackend2.cpython-310-darwin.so

https://dev.intelrealsense.com/docs/python2


Saturday, February 5, 2022

Realsense on Raspberry

 https://github-wiki-see.page/m/acrobotic/Ai_Demos_RPi/wiki/Raspberry-Pi-4-and-Intel-RealSense-D435


Raspberry Pi 4 and Intel RealSense D435 - acrobotic/Ai_Demos_RPi Wiki

Pre-install Requirements

  • Start with updating, upgrading, and installing dependencies and tools:
sudo apt-get update && sudo apt-get dist-upgrade
sudo apt-get install automake libtool vim cmake libusb-1.0-0-dev libx11-dev xorg-dev libglu1-mesa-dev
  • Expand the filesystem by selecting the Advanced Options menu entry, and select yes to rebooting:
sudo raspi-config
  • Increase swap to 2GB by changing the file below to CONF_SWAPSIZE=2048:
sudo vi /etc/dphys-swapfile
  • Apply the change:
sudo /etc/init.d/dphys-swapfile restart swapon -s
  • Create a new udev rule:
cd ~
git clone https://github.com/IntelRealSense/librealsense.git
cd librealsense
sudo cp config/99-realsense-libusb.rules /etc/udev/rules.d/ 
  • Apply the change (needs to be run by root):
sudo su
udevadm control --reload-rules && udevadm trigger
exit
  • Modify the path by adding the following line to the .bashrc file:
export LD_LIBRARY_PATH=/usr/local/lib:$LD_LIBRARY_PATH
  • Apply the change:
source ~/.bashrc

Installation

  • Install protobuf — Google's language-neutral, platform-neutral, extensible mechanism for serializing structured data:
cd ~
git clone --depth=1 -b v3.10.0 https://github.com/google/protobuf.git
cd protobuf
./autogen.sh
./configure
make -j1
sudo make install
cd python
export LD_LIBRARY_PATH=../src/.libs
python3 setup.py build --cpp_implementation 
python3 setup.py test --cpp_implementation
sudo python3 setup.py install --cpp_implementation
export PROTOCOL_BUFFERS_PYTHON_IMPLEMENTATION=cpp
export PROTOCOL_BUFFERS_PYTHON_IMPLEMENTATION_VERSION=3
sudo ldconfig
protoc --version
  • Install libtbb-dev parallelism library for C++:
sudo apt install -y libtbb-dev
  • Install RealSense SDK librealsense:
cd ~/librealsense
mkdir  build  && cd build
cmake .. -DBUILD_EXAMPLES=true -DCMAKE_BUILD_TYPE=Release -DFORCE_LIBUVC=true
make -j1
sudo make install
  • Install RealSense SDK pyrealsense2 Python bindings for librealsense:
cd ~/librealsense/build
cmake .. -DBUILD_PYTHON_BINDINGS=bool:true -DPYTHON_EXECUTABLE=$(which python3)
make -j1
sudo make install
  • Modify the path by adding the following line to the .bashrc file:
export PYTHONPATH=$PYTHONPATH:/usr/local/lib
  • Apply the change:
source ~/.bashrc
  • Install OpenGL:
sudo apt-get install python-opengl
sudo -H pip3 install pyopengl
sudo -H pip3 install pyopengl_accelerate==3.1.3rc1
  • Change pi settings (enable OpenGL):
sudo raspi-config
"7. Advanced Options" – "A8 GL Driver" – "G2 GL (Fake KMS)"

Remote Operation

  • Enable VNC:
"3. Boot Options" – "B1 Desktop/CLI" – "B4 Desktop Autologin"
"5. Interfacing Options" – "P3 VNC" – "Yes"
"7. Advanced Options" – "A5 Resolution" – "DMT Mode 85 1280X720 60Hz 16:9"
  • Select "Finish" on the raspi-config menu, and select "Yes" to rebooting

  • Install a VNC client on another computer, for example VNC Viewer by RealVNC

  • VNC into the Raspberry Pi and run the built-in viewer from a terminal window:

realsense-viewer

Image of Intel's RealSense Viewer

Debugging

pi@raspberrypi:~ $ realsense-viewer
Could not initialize offscreen context!

There is a difference between running vncserver from the terminal and using raspi-config to install it. So, if you see the below output you're doing it wrong:

pi@raspberrypi:~ $ glxgears -info
GL_RENDERER = llvmpipe (LLVM 9.0.1, 128 bits)
GL_VERSION = 3.1 Mesa 19.3.2
GL_VENDOR = VMware, Inc.

Output known to be working:

GL_RENDERER = V3D 4.2
GL_VERSION = 2.1 Mesa 19.3.2
GL_VENDOR = Broadcom

The process to make the necessary changes is described in raspberrypi/Raspberry-Pi-OS-64bit#21 and raspberrypi/Raspberry-Pi-OS-64bit#3. It comes down to how we run vncserver, running it from a Putty terminal uses a VMware driver, whereas running it via sudo raspi-config > interfacing options > vncserver > enable and directly login from the VNC client app then uses the necessary Broadcom driver.

pi@raspberrypi:~ $ realsense-viewer
GLFW Driver Error: GLX: GLX version 1.3 is required
Could not initialize offscreen context!

Follow the steps described in IntelRealSense/librealsense#7343.

Friday, January 14, 2022

Intel RealSense Notes

 SDK:

Git Repository:

https://github.com/IntelRealSense/librealsense/releases/tag/v2.50.0


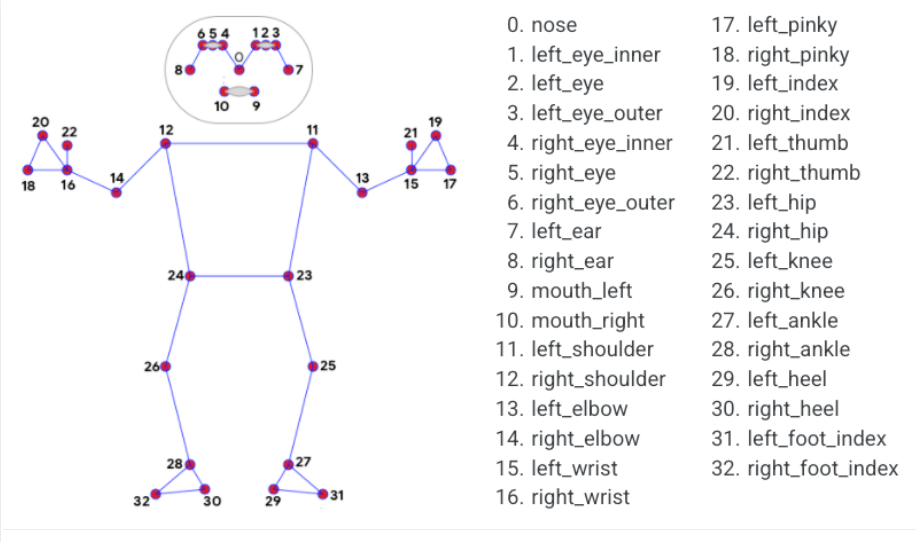
https://www.analyticsvidhya.com/blog/2021/05/pose-estimation-using-opencv/


Visual Odometry

  1. Google Cartographer
  2. GMapping
  3. Hector SLAM
  4. RTabMap
  5. ORB SLAM
  6. Rovio


Robotic Operating System

OpenSource SLAM


+70 case studies from studios & firms using the Unity engine | Case study, testimonials & showcase | Unity


On Raspberry:

https://issueexplorer.com/issue/IntelRealSense/librealsense/9865


Below is practice on Windows 10

Ensure to use correct python to install modules, otherwise, you may get error:
ModuleNotFoundError: No module named

python -m pip install pyrealsense2

pip uninstall pyrealsense2

python -m pip install opencv-python

https://github.com/BakingBrains/Pose_estimation

Link to the Youtube video: https://www.youtube.com/watch?v=brwgBf6VB0I


# Skeleton Tracking

python -m pip install --find-links="%CUBEMOS_SKEL_SDK%\wrappers\python" cubemos.skeletontracking


cd "%CUBEMOS_SKEL_SDK%\wrappers\python"

cd "%CUBEMOS_SKEL_SDK%\samples\python\"

c. Run the sample on a local image

python skeleton-tracking-image.py ..\res\images\skeleton_estimation.jpg

To save the results you can use an additional parameter:

python skeleton-tracking-image.py -o C:\tmp\output.jpg `

..\res\images\skeleton_estimation.jpg

Sunday, December 19, 2021

Flask Web Development

 References:

https://codeburst.io/building-your-first-chat-application-using-flask-in-7-minutes-f98de4adfa5d


Thursday, November 26, 2020

Terraform Modularizing

To improve code reusability and manageability, DevOps engineers are modularizing their code. 

Dependencies Inverse

Depth of Modules

How to pass parameters between modules 

Tuesday, November 24, 2020

Terraform: using template to cast policy

 data "aws_caller_identity" "current" {

}

# Allow the AWS Config role to deliver logs to configured S3 Bucket.
# Derived from IAM Policy document found at https://docs.aws.amazon.com/config/latest/developerguide/s3-bucket-policy.html
data "template_file" "aws_config_policy" {
template = <<JSON
{
"Version": "2012-10-17",
"Statement": [
{
"Sid": "AWSConfigBucketPermissionsCheck",
"Effect": "Allow",
"Action": "s3:GetBucketAcl",
"Resource": "$${bucket_arn}"
},
{
"Sid": "AWSConfigBucketExistenceCheck",
"Effect": "Allow",
"Action": "s3:ListBucket",
"Resource": "$${bucket_arn}"
},
{
"Sid": "AWSConfigBucketDelivery",
"Effect": "Allow",
"Action": "s3:PutObject",
"Resource": "$${resource}",
"Condition": {
"StringLike": {
"s3:x-amz-acl": "bucket-owner-full-control"
}
}
}
]
}
JSON

vars = {
bucket_arn = format("arn:%s:s3:::%s", data.aws_partition.current.partition, var.config_logs_bucket)
resource = format(
"arn:%s:s3:::%s%s%s/AWSLogs/%s/Config/*",
data.aws_partition.current.partition,
var.config_logs_bucket,
var.config_logs_prefix == "" ? "" : "/",
var.config_logs_prefix,
data.aws_caller_identity.current.account_id,
)
}
}

Friday, September 25, 2020

Run CloudFormation in Command Line

 $ aws cloudformation create-stack --stack-name test-vpc --template-body file://vpc/goweekend-vpc-1-dev.yaml --profile my profile --parameters ParameterKey=Environment,ParameterValue=goweekend-devops-esloyalty-vpc-1 ParameterKey=Infrastructure,ParameterValue= ParameterKey=VpcName,ParameterValue=goweekend-devops-esloyalty-vpc-1-prod


aws cloudformation delete-stack --stack-name test-vpc --profile my profile

Wednesday, August 12, 2020

Boto3: Client vs Resource vs Session

 Here's some more detailed information on what Client, Resource, and Session are all about.

Client:

  • low-level AWS service access
  • generated from AWS service description
  • exposes botocore client to the developer
  • typically maps 1:1 with the AWS service API
  • all AWS service operations are supported by clients
  • snake-cased method names (e.g. ListBuckets API => list_buckets method)

Here's an example of client-level access to an S3 bucket's objects (at most 1000**):

import boto3

client = boto3.client('s3')
response = client.list_objects_v2(Bucket='mybucket')
for content in response['Contents']:
    obj_dict = client.get_object(Bucket='mybucket', Key=content['Key'])
    print(content['Key'], obj_dict['LastModified'])

** you would have to use a paginator, or implement your own loop, calling list_objects() repeatedly with a continuation marker if there were more than 1000.

Resource:

  • higher-level, object-oriented API
  • generated from resource description
  • uses identifiers and attributes
  • has actions (operations on resources)
  • exposes subresources and collections of AWS resources
  • does not provide 100% API coverage of AWS services

Reference: 

https://stackoverflow.com/questions/42809096/difference-in-boto3-between-resource-client-and-session


Here's the equivalent example using resource-level access to an S3 bucket's objects (all):

import boto3

s3 = boto3.resource('s3')
bucket = s3.Bucket('mybucket')
for obj in bucket.objects.all():
    print(obj.key, obj.last_modified)

Note that in this case you do not have to make a second API call to get the objects; they're available to you as a collection on the bucket. These collections of subresources are lazily-loaded.

You can see that the Resource version of the code is much simpler, more compact, and has more capability (it does pagination for you). The Client version of the code would actually be more complicated than shown above if you wanted to include pagination.

Session:

  • stores configuration information (primarily credentials and selected region)
  • allows you to create service clients and resources
  • boto3 creates a default session for you when needed

A useful resource to learn more about these boto3 concepts is the introductory re:Invent video.

Python argpars

 https://stackoverflow.com/questions/24180527/argparse-required-arguments-listed-under-optional-arguments


In general, the argparse module assumes that flags like -f and --bar indicate optional arguments, which can always be omitted at the command line.

Note: Required options are generally considered bad form because users expect options to be optional, and thus they should be avoided when possible.


parser = argparse.ArgumentParser(description='Foo')
parser.add_argument('-o', '--output', help='Output file name', default='stdout')
requiredNamed = parser.add_argument_group('required named arguments')
requiredNamed.add_argument('-i', '--input', help='Input file name', required=True)
parser.parse_args(['-h'])